In this post, you’ll learn about CSS Z-index and Stacking Context with some examples.
Let’s get started!🚀
What is CSS z-index?
The CSS z-index property is used to determine the order of elements in the stack, which means which element will be on top of which element.
In your web page, if you want one element to be on top of the others, then you can use the z-index property. It helps you control the order in which elements are layered on the screen.
For this to work, you give value to the elements. An element with a higher value will always be on top of an element with a lower value.
Here, on top of the other element means one element will be on top of the other in the z-axis or simply will be in front of the screen.

Don’t worry if you don’t understand the above theoretical part. I’ll explain it with examples to make it clear for you.
Note: The z-index property will only work on positioned elements (position: relative, position: absolute, position: fixed, or position: sticky) and flex items. It will not work on static-positioned elements.
Syntax for CSS z-index
z-index: auto|number|initial|inherit;
Here,
- auto – Sets the stack order of the element equal to its parent element. This is the default value.
- number – You give it a number (like 0, 1 etc.). Negative numbers are allowed.
- initial – Sets the value to its default value.
- inherit – Inherits this property from its parent element.
CSS z-index Values
The z-index values can be positive, negative, or zero. Elements with higher z-index values will always be on top of the elements with lower z-index values.
What if I give two elements the same z-index value?
If two elements have the same z-index value, then the one that comes later in the HTML code will be on top.
Now, let’s take a look at some examples to understand z-index.
<div class="box box1"></div>
<div class="box box2"></div>
Example 1:
.box {
width: 100px;
height: 100px;
position: absolute;
}
.box1 {
background-color: red;
z-index: 2;
top: 20px;
left: 20px;
}
.box2 {
background-color: blue;
z-index: 1;
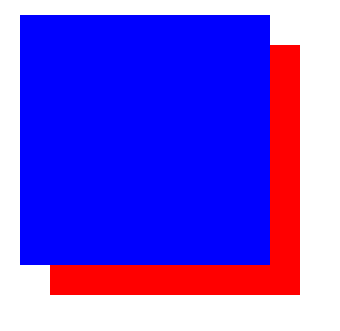
}Output:

Here, .box1 or red box will be in front or on top because it has a higher z-index value.
Example 2: With the same z-index values
.box {
  width: 100px;
  height: 100px;
  position: absolute;
}
.box1 {
  background-color: red;
  z-index: 2;
  top: 20px;
  left: 20px;
}
.box2 {
  background-color: blue;
  z-index: 2;
}
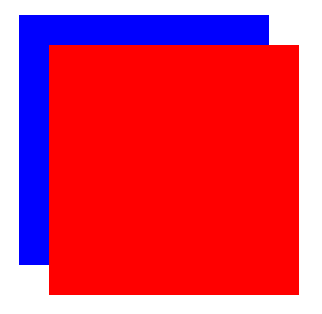
Output:
Here, the z-index value of both the boxes are the same, so the blue box (.box2) will be on top, because it comes later in the HTML code.
Example 3: With negative z-index values
.box {
  width: 100px;
  height: 100px;
  position: absolute;
}
.box1 {
  background-color: red;
  z-index: -3;
  top: 20px;
  left: 20px;
}
.box2 {
  background-color: blue;
  z-index: -5;
}
Output:
Here, .box1 or red box will be on top because it has a higher z-index value.
CSS Stacking Context
Let’s understand the concept of stacking context. Imagine it as a three-dimensional arrangement of HTML elements along the z-axis. Each stacking context operates independently, and the z-index values of elements are only compared within the same stacking context.
To put it simply, think of a stacking context as a container for certain HTML elements. Elements within the same stacking context follow a set of rules for how they should be layered along the z-axis. This stacking order is determined by the z-index property.
Creating a Stacking Context
If any element is in the following scenarios, then a stacking context will be formed.
- Root Element
The root element (<html>) is always a stacking context. This provides a baseline for stacking on the entire page. - Positioned
ElementsElements with apositionvalue other thanstatic(it’s the default value) and az-indexvalue other thanauto(it’s the default value) creates its own stacking context. - Flex Containers and Grid Containers
Elements withdisplay: flexordisplay: gridproperties and az-indexvalue other thanautocreates a stacking context. - Opacity Less than 1
Elements who has anopacityvalue less than 1 creates a stacking context. - Transform or Filter Property
Elements with atransformorfilterproperty other thannonecreates a stacking context.
You can read about more such scenarios here.
But Why Does Stacking Context Matter?
Stacking context matters because it defines the rules for how elements are layered in the three-dimensional arrangement of elements. Elements within different stacking contexts don’t interfere with each other’s stacking order.
Let’s jump into an example to make it more clear.
<div class="context">
   <div class="box box1">Box 1</div>
   <div class="box box2">Box 2</div>
   <div class="box box3">Box 3</div>
</div>

<div class="box no-context"></div>
CSS:
.context {
  position: relative; /* Creating a stacking context using position relative */
  width: 200px;
  height: 200px;
  background-color: #c9c9c9;
}
.box {
  position: absolute;
  width: 100px;
  height: 100px;
  color: white;
  text-align: center;
}
.box1 {
  top: 20px;
  left: 20px;
  z-index: 2;
  background-color: rgb(211, 74, 74);
}
.box2 {
  top: 50px;
  left: 50px;
  z-index: 1;
  background-color: rgb(60, 60, 179);
}
.box3 {
  top: 80px;
  left: 80px;
  background-color: rgb(45, 145, 45);
}
.no-context {
  width: 150px;
  height: 150px;
  background-color: #7397af;
  margin-top: 30px;
  z-index: 3; /*z-index without a stacking context */
}
In the above example,
- The
.contextelement has propertyposition: relative;so it creates a stacking context. - We have three elements with the class names
.box1,.box2and.box3inside the.contextelement. - The
.box1and.box2elements have positioned values,topandleft, and.box3element has the default position. - The
.no-contextelement outside the.contextelement does not have a stacking context. - The
.no-contextelement has a higherz-indexvalue, but it won’t affect the stacking order inside the.contextelement because it’s outside the stacking context of.context.
Output:
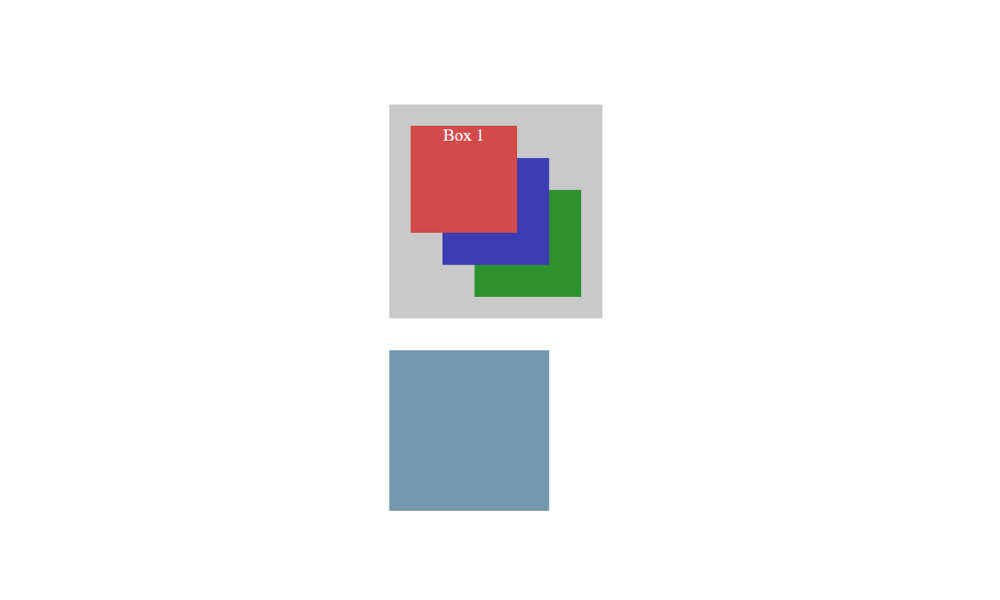
In simple words, stacking context is a container of certain HTML elements, and the value of the z-index of elements outside the stacking context does not affect the elements inside the stacking context.
That’s all for today!
If you’re new to web development, check out Learnify — my curated platform with beginner-friendly tutorials to help you learn web development step-by-step with examples and simple explanations.
If you enjoy my work and want to support what I do buy me a coffee!
Every small gesture keeps me going! 💛
Follow me on X (Twitter) to get daily web development tips & insights.
Enjoyed reading? You may also find these articles helpful.
What is !important in CSS and Why You Shouldn’t Use It
CSS Media Queries: Beginner’s Guide For Responsive Website
Thanks for sharing. I read many of your blog posts, cool, your blog is very good.