
There are many useful JavaScript tricks that can make your code cleaner, more efficient, and easier to maintain. Whether you’re handling objects, manipulating strings, or optimizing browser interactions, the right JavaScript tricks can save you time and effort.
In this post, I’ll share 13 must-know JavaScript tricks that every developer should know. These will help you write better code, improve performance, and boost your skills.
Let’s jump right into it!🚀
Convert a JavaScript Object or Value to a JSON String
You can use the JSON.stringify() method to convert a JavaScript object or value into a JSON string format.
This is helpful when you need to send data to a server or save it in a format that’s easy to share.
For example:
const person = { name: "Mark", age: 25, city: "New York" };

const jsonString = JSON.stringify(person);

console.log(jsonString);
// Output: '{"name":"Mark","age":25,"city":"New York"}'
Replacer Function
You can pass a second parameter to JSON.stringify(), which is a replacer function or array. This allows you to filter or modify the values being stringified.
For example:
const person = { name: "Mark", age: 25, city: "New York" };

// Replacer function to exclude the city field
const jsonString = JSON.stringify(person, (key, value) => {
  if (key === "city") {
    return undefined; // Exclude city from JSON string
  }
  return value;
});

console.log(jsonString);
// Output: '{"name":"Mark","age":25}'
Formatting the JSON String
You can format the resulting JSON string to make it more readable by adding spaces for indentation using a third argument.
For example:
const person = { name: "Mark", age: 25, city: "New York" };
const jsonString = JSON.stringify(person, null, 2);
console.log(jsonString);
// Output:
// {
//   "name": "Mark",
//   "age": 25,
//   "city": "New York"
// }
If you pass null as the second parameter, it means that no filtering will be applied to the object, and all keys and values will be included in the resulting JSON string.
Convert a JSON String Back into an Object
You can use the JSON.parse() method to convert a JSON string back into a JavaScript object.
This is useful when you receive data in JSON format (like from a server) and want to work with it as a regular JavaScript object.
For example:
const jsonString = '{"name": "Mark", "age": 25, "city": "New York"}';
const jsonObject = JSON.parse(jsonString);

console.log(jsonObject);
// Output: { name: "Mark", age: 25, city: "New York" }
If the JSON string is malformed or doesn’t conform to proper JSON syntax, JSON.parse() will throw a SyntaxError.
Reviver Function
You can also use a second parameter with the JSON.parse() method, called a reviver, which allows you to transform the values as they are parsed. This is optional.
For example:
const jsonString = '{"name": "Mark", "age": 25, "city": "New York"}';
const jsonObject = JSON.parse(jsonString, (key, value) => {
  if (key === "age") {
    return value + 1; // Increment age by 1 during parsing
  }
  return value;
});

console.log(jsonObject);
// Output: { name: "Mark", age: 26, city: "New York" }
In this example, a reviver function is used to modify the age property during parsing.
Copy Properties from Source Object to Target Object
The Object.assign() method can be used to copy the values and properties from one or more source objects to a target object.
If a property already exists in the target object, it will be overwritten by the value from the source object.
This is helpful when you want to merge properties from multiple objects into one.
Syntax:
Object.assign(targetObject, sourceObject);
Example:
const target = { a: 1, b: 2 };
const source = { b: 4, c: 5 };

const mergedObject = Object.assign(target, source);
console.log(mergedObject);
// Output: { a: 1, b: 4, c: 5 }
You can also create a shallow copy of an object using Object.assign() method.
const person = { name: "Mark", age: 25 };
const cloneObject = Object.assign({}, person);
console.log(cloneObject);
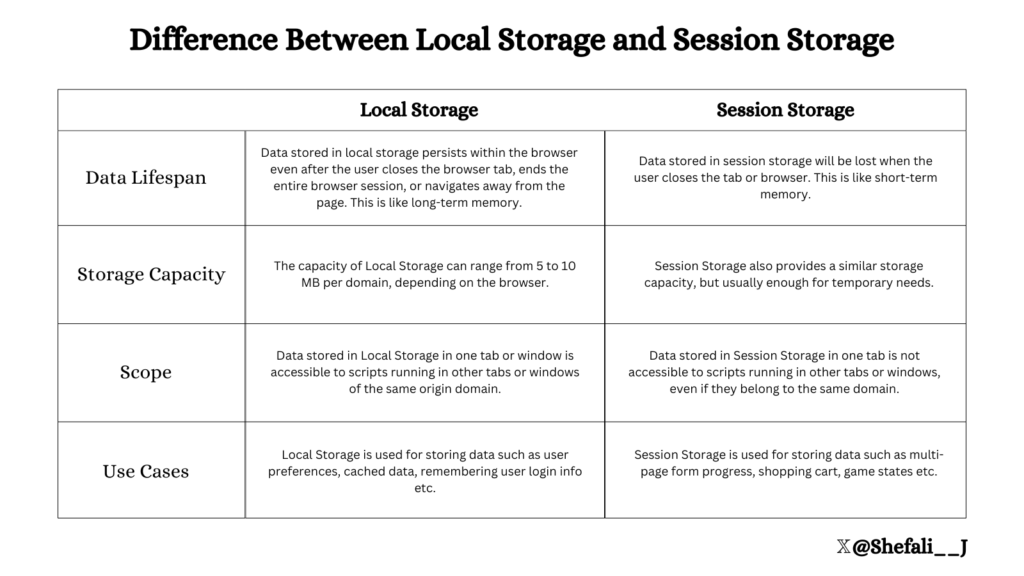
// Output: { name: 'Mark', age: 25 }Difference Between Local Storage and Session Storage
Get the Browser’s Dimensions
You can get the browser’s current dimensions using the window.innerWidth and window.innerHeight properties.
Example:
const width = window.innerWidth;  // Get the width of the browser's viewport
const height = window.innerHeight; // Get the height of the browser's viewport

console.log(`Width: ${width}, Height: ${height}`);
// Example Output: Width: 1024, Height: 768
Get the Dimensions Excluding Scrollbars
If you need the dimensions excluding scrollbars, you can use document.documentElement.clientWidth and document.documentElement.clientHeight.
Example:
const width = document.documentElement.clientWidth;
const height = document.documentElement.clientHeight;

console.log(`Viewport width: ${width}, height: ${height}`);
Handle Events on Window Resize
You can use the resize event to handle actions when the browser window is resized.
Example:
window.addEventListener('resize', () => {
  console.log(`Window resized to ${window.innerWidth} x ${window.innerHeight}`);
});
window.addEventListener('resize', callback): Attaches an event listener to theresizeevent. The callback function runs every time the window is resized.window.innerWidthandwindow.innerHeight: These give the current dimensions of the window.
Use Cases
- Create designs that adjust to different screen sizes (responsive design).
- Track how users resize their browser windows for analytics.
Make an Object Unchangeable
The Object.freeze() method can be used to prevent any changes to an object, including adding, modifying or deleting properties. That means,
- You can’t add new properties.
- You can’t change existing properties.
- You can’t delete any properties.
This is helpful when you want to keep the object exactly as it is.
Syntax:
Object.freeze(obj);
Example:
const person = { name: "Mark", age: 25 };

// Freeze the object
Object.freeze(person);

// Modification of the object is not allowed
person.age = 30; // This won't work
person.profession = "Web developer"; // This won't work

console.log(person); // Output: { name: "Mark", age: 25 }
Object.isFrozen()
You can check if an object is frozen using Object.isFrozen().
Syntax:
Object.isFrozen(obj);
Example:
const person = { name: "Mark", age: 25 };
Object.freeze(person);

Object.isFrozen(person); // Output: true
Optional Chaining
The optional chaining (?.) operator helps you safely access a property or call a function on an object. If the object or function you’re trying to access is undefined or null, it will return undefined instead of causing an error.
Example:
const user = {
    car: {
        model: "Tesla"
    }
};

console.log(user.bike?.model); // undefined
console.log(user.car?.model); // Tesla
console.log(user.bike.model); // TypeError: user.bike is undefined
Why Use Optional Chaining?
- Prevents Errors: Avoids runtime errors when accessing deeply nested properties or calling functions.
- Clean Code: Eliminates the need for verbose checks like
if (obj && obj.prop).
Tip: You can pair optional chaining with the nullish coalescing operator (??) to provide a default value when the result is undefined.
For example:
const bikeModel = user.bike?.model ?? "Unknown";
console.log(bikeModel); // Output: Unknown
Note: Optional chaining is useful, but don’t overuse it—it might hide problems.
For example, if a property is undefined when it shouldn’t be, optional chaining could make it harder to spot the issue.
Prevent Adding or Removing Properties from an Object
The Object.seal() method can be used to prevent adding or removing properties from an object.
You can still change the values of existing properties, but you can’t add or remove any properties.
This is helpful when you need a fixed object structure but want to update the property values.
Syntax:
Object.seal(obj);
Example:
const person = { name: "Mark", age: 25 };

Object.seal(person);

// You can modify existing properties
person.age = 30; // Allowed
console.log(person.age); // 30

// Adding or removing properties is not allowed
person.profession = "Web Developer"; // Ignored
delete person.name; // Ignored

console.log(person); // { name: "John", age: 30 }
Object.isSealed()
You can check if an object is sealed using Object.isSealed(obj).
Syntax:
Object.isSealed(obj);
Example:
const person = { name: "Mark", age: 25 };
Object.seal(person);

Object.isSealed(person); // true
Remove Whitespace from String
You can remove whitespace from both ends of a string using the trim() method.
Example:
const str = "   Hello World!   ";
console.log(str.trim()); // Output: "Hello World!"
Benefits
- Neat Strings: Eliminates unnecessary spaces.
- Cleaner Data: Useful for preparing user input or formatting text.
Scroll the Page to a Specific Position
You can use the window.scrollTo() method to scroll the page to a specific position.
Syntax:
window.scrollTo(x, y);
xis the horizontal scroll position.yis the vertical scroll position.
Example:
// Scroll to 500px from the top of the page
window.scrollTo(0, 500);
You can also use smooth scrolling for a better user experience:
window.scrollTo({
  top: 500,       // Vertical position
  left: 0,        // Horizontal position
  behavior: 'smooth', // Smooth scroll
});
Use Cases
- Scroll to specific sections on button clicks.
- Improve navigation experience for single-page applications.
- Focus user attention on important content.
Shorthand Assignment Operators
Shorthand assignment operators simplify your code by combining math operations (like addition, subtraction, or multiplication) with assigning a value in one step.
Examples:
Addition Assignment (+=):
let a = 5;
a += 3; // Same as: a = a + 3
console.log(a); // Output: 8
Subtraction Assignment (=):
let a = 10;
a -= 4; // Same as: a = a - 4
console.log(a); // Output: 6
Multiplication Assignment (=):
let a = 6;
a *= 2; // Same as: a = a * 2
console.log(a); // Output: 12
Division Assignment (/=):
let a = 15;
a /= 3; // Same as: a = a / 3
console.log(a); // Output: 5
Remainder Assignment (%=):
let a = 10;
a %= 3; // Same as: a = a % 3
console.log(a); // Output: 1
Exponentiation Assignment (*=):
let a = 3;
a **= 2; // Same as: a = a ** 2
console.log(a); // Output: 9
Shorthand assignment operators make your code shorter and easier to write, helping you work faster and more efficiently.
Splitting a String by Multiple Delimiters
You can split a string at both commas and semicolons using the split() method along with Regular Expressions.
Example:
const str = "mango,orange;apple,grape;kiwi";
const splitedStr = str.split(/[,;]/);

console.log(splitedStr);
// Output: [ 'mango', 'orange', 'apple', 'grape', 'kiwi' ]
How It Works
split()Method: Splits a string into an array based on a specified pattern.- Regular Expression
/[,;]/:[,]matches a comma.[;]matches a semicolon.- Combined
[;,]matches both.
If you want to split a string at spaces, commas, semicolons, or even periods, you can extend the regular expression.
For example:
const str = "apple, banana; cherry orange. grape";
const splitedStr = str.split(/[,; .]+/);

console.log(splitedStr);
// Output: [ 'apple', 'banana', 'cherry', 'orange', 'grape' ]
Regular Expression /[,; .]+/:
[,; .]matches any of the characters: comma, semicolon, space, or period.+means “one or more occurrences” of any of the specified characters.
Benefits
- Flexible Splitting: You can easily handle multiple delimiters in one line of code.
- Simplifies Data Handling: Transforms complex strings into clean, usable arrays.
That’s all for today!
I hope you find these JavaScript tricks helpful.
Let me know your favorite JavaScript tricks in the comments👇
If you’re new to web development, check out Learnify — my curated platform with beginner-friendly tutorials to help you learn web development step-by-step with examples and simple explanations.
If you enjoy my work and want to support what I do buy me a coffee!
Every small gesture keeps me going! 💛
Follow me on X (Twitter) to get daily web development tips & insights.
Enjoyed reading? You may also find these articles helpful.
9 Must-Know GitHub Repositories to Learn JavaScript
14 JavaScript Console Methods for Effective Debugging
Thank you for sharing excellent informations. Your web-site is very cool. I’m impressed by the details that you?¦ve on this website. It reveals how nicely you perceive this subject. Bookmarked this website page, will come back for more articles. You, my friend, ROCK! I found just the information I already searched all over the place and simply couldn’t come across. What a perfect website.
Generally I don’t read article on blogs, but I wish to say that this write-up very pressured me to take a look at and do it! Your writing taste has been amazed me. Thank you, quite nice post.
That really means a lot! Thank you so much for your comment.
I’ve been absent for some time, but now I remember why I used to love this blog. Thank you, I’ll try and check back more frequently. How frequently you update your site?